Is there anything more thrilling than working with power tools? I mean, creating a delicious meal, dressing up for a night out, and finding a designer label 75% off in TJMaxx all have their respective places in my heart, but there is just something about sawdust and work boots that gets my motor running! And I'm not gunna lie, when I revved up the jig saw for this project I felt like a boss!
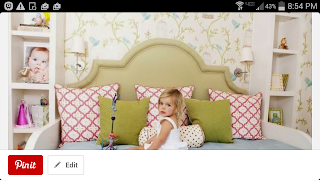
I do, however, have a love for all things girly, so when we found out our second child was going to be a girl, I got so excited! We left for a vacation in London the very next day and I think I came back with about 20 little dresses for our Lilly Kate! Putting them away in her future room, I realized we had a lot of work to do to make this room suitable for our little princess. There was a twin bed in the room which was currently serving as a guest room. Not wanting to get rid of the bed as it will one day be used by our toddler son, Matthew, I decided we'd keep it in the room and find a way to make it look fabulous with the rest of the decor. I didn't want to spend a ton of money on a girly headboard since our son will be using the bed sooner than Lilly Kate, so I opted to make a daybed headboard that could also be used for a king sized bed in our master bed room down the road. I found my inspiration piece at rhbabyandchild.
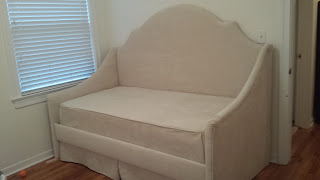
Not wanting to do all of that tufting, I decided to make the back of the daybed a little more interesting. A curve here and there and voilà!
A-like ziss......
So without further ado, here's the play-by-play of my diy upholstered daybed.
So remember I said we had a twin bed already? Well, it was complete with a frame, so instead of building an entire bed, I decided to build just a headboard, side rails, and a front connecting rail to surround the existing frame. Not only did this sound easier, it also seemed a lot safer since my construction skills are very limited and I didn't want my kiddos or anyone else sitting on the bed to come crashing down if I missed some important structural element like, say, cross-beam support legs or something. Down the road I might decide to embark on the cross-beam journey, but today it's all about aesthetics.
Step numero uno: measure, measure, and measure some more...
First, I measured the outside of the box springs since they were the longest and widest part of the bed. Then I added a few inches to the width to accommodate the foam and batting for the headboard. Then I created a cut list for the lumber.
Step number two: make a plan...
I decided to use plywood framed out with 1x4's and 1x6's to give it structure and gravitas. I initially decided to use L-brackets to connect the headboard to the side rails, but I wanted to use bed frame rail connectors for the front connecting piece. I ordered those online and I still might use those to connect the headboard to the sides..I'm in the final stages now, so we'll see...
Step three: buy stuff...
Here's what I bought for the project:
2 sheets of 4'x8' plywood, (one cut to 75", the other cut into two 42" pieces with a little leftover)
1 1x8, cut to 75" for front connecting piece
6 1x4's, (two cut in half, the others cut to 42" and 25")
1 1x6 (cut in half for transport)
Four six-inch L-brackets
Bed rail connectors (aka joinery hooks, available online)
A variety of wood screws
Two slabs of 2" foam from joann fabrics (using my 60% off coupon it came to about $75)
8.5 yards of 90" comfort loft batting
13.5 yards of 54" fabric (mine was actually 57" wide)
Curve ease ply grip (available online)
Welt cording
Step 4: cut, glue, and screw
I drew out a design on the large plywood using string to make the large curve in the middle and a 25" diameter circle as a template for the side curves. I just kind of eyeballed it at first and then decided to use the computer to get a better visual.
I tried several different variations until I found one I liked and then I traced it out on my plywood using string and rulers and homemade cardboard circles. I used a long piece of thin trim and bent it to get a curve for my side rails. Time to cut.
Once I had cut my headboard and side rails, I framed them out with 1x4s. For the headboard I used one 48" piece down the center and cut the other 48" pieces to fit the sides. I cut the 1x6 to fit the shape of the headboard and glued, clamped, and drilled pilot holes before screwing them together. For the side rails, I doubled up the 1x4's, glued and screwed them together and then glued and screwed them into the plywood. Btw, you should screw through the plywood into the 1x4's when doing this.
I'm realizing now I should have taken more pictures of this step...i got caught up in the fun of being all handy and stuff....I cut the 1x4s about 3 or 4 inches shorter than the top of the side rails so I could add foam all across the top.
Step 5: upholster
For the side rails, the foam is going to go on the same side as the framing. I used my handy dandy meat carver to cut the foam and used spray adhesive to keep it in place.
I cut the foam about 4 inches taller than the board so I could "fold" it over the edge so it would be nice and cushy. Cover the side pieces with two layers of batting and staple, staple, staple! When stapling around the top, it's best to catch a little of the foam just on the edge so it stays in place. Then add the fabric and staple. Be sure to clip the fabric so it will fit snugly through the curve. Fold excess fabric neatly on the corners.
Follow the same process for the headboard, only attach the foam to the opposite side (the side without framing). That's it for the headboard unless you want to add fabric to the back to finish it off. For the side rails, we still have some more work to do. First I sewed some fabric around the cording to make my own matching piping. Then I stapled down three layers of batting on the unfinished backside of the side rail. I stapled the piping around that, and then stapled the curve ease down around the top, front, and bottom, but not the back. I watched a few tutorials online and they make that step sound so simple, but that stuff is hard to work with! First of all, it is SHARP! I think it was inspired by a medieval torture device. Secondly, you are supposed to be able to staple it down through a 2mm hole with your staple gun. Getting that junk lined up is not easy, but once you hit the sweet spot, if you can remember it, it goes a lot smoother. There are lots of video tutorials on how to use this stuff so I'm going to defer to them...It's a lot easier if you see someone doing it than if I describe it to you. But when you are finished, this is what you will get.
As you can see the back of the fabric is not yet secured. This is important because you want to be able to secure your L brackets underneath the fabric. Btw please disregard the unmade bed in the background...I'd like you to believe this is not normal, but we rarely make the bed, especially when I am literally making a bed. So that's where I'm at right now. I will hopefully have more detailed photos of how to upholster the sides shortly. As of right now, I'm laid up with a broken/bruised toe so I can't finish the project yet. You'd think this injury would be due to the construction project, but no...I dropped a heavy meatloaf pan on it putting away dishes...anywho... Next post coming soon!


